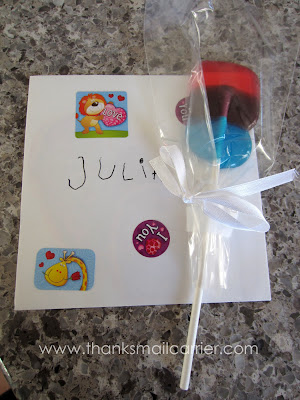
A good friend (and Pinterest addict) had found directions online for making homemade lollipops out of Jolly Rancher candies. The results were extremely cute and, after hearing the instructions, I knew would be easy enough for us to make as well.
With Valentine's Day around the corner and my kids wanting to give a little something tasty along with their valentines at school, it was the perfect time to try these out ourselves.
 Step 1: Gather the "ingredients."
You'll need a baking sheet, aluminum foil, parchment paper, lollipop sticks, cellophane bags (if wrapping), and Jolly Ranchers.
 Step 2: Preparation (preheat the oven to 275°F).
Cover your baking sheet with a piece of aluminum foil and then a piece of parchment paper on top of it. Unwrap and place Jolly Ranchers together in groups of two (for regular size lollipops) or three (for jumbo lollipops). Leave enough space in between them that they won't melt together and so that you will have room to place a stick without it getting stuck into one of its neighbors.
We made sure that our lollipops would always have three different colors, but that just makes them more colorful. If you're a fan of one particular flavor or want to make them one solid color, that works just as well.
 Step 3: Melt!
Place the baking sheet into the preheated oven and let the Jolly Ranchers get to where they have melted slightly together. We found that this took approximately 6 minutes, but that the best method was to keep an eye on them and especially watch closely after the 5 minute mark or so.
You don't want them to melt too far so that they're too thin for a stick, yet not far enough results in a more difficult time getting that stick to stay put.
 Step 4: Remove and add sticks.
Much to the kids' dismay, my husband and I did this step ourselves. You have to work quickly to place and twist the sticks into the melted Jolly Ranchers before the candies harden, while also being careful to not touch the hot pan.
We found that if you push slightly in the opposite direction that you are twisting, that it helps get the candy to full cover the stick and therefore hold it firmly in place.
 Step 5: Cool.
Even though these will pop off of the parchment paper after only a short amount of time, we left them to sit for around a half hour to ensure that they were fully cooled and wouldn't stick to the bags.
Needless to say, we were pretty excited about how cute they had turned out!
 Step 6: Wrap.
Popping them into our lollipop bags, I tied the ribbons and we were set to go. You could use any sort of plastic bags or plastic wrap to cover these (or just toss them all in a bag together if you aren't gifting them), but for our valentines, I found that Wilton's lollipop bags that are prepackaged with ribbons attached were very convenient.
Using a single piece of tape, we attached a lollipop to each of our cards and sat back to survey the results.
 Both girls are beyond excited to get to hand these homemade lollipops out to their friends and announce that they were the ones who made them. As for the taste, who doesn't love the sweet tang of a good Jolly Rancher? Except now there are three different flavors in one... yum!
Happy Valentine's Day!


11 comments:
How fun! We did simple Valentine's this year and I'm afraid they aren't going to be as "cool" as everyone else has. Oh well!
Those are pretty darn easy to make, and if you really, really love just one flavor you can focus on it. (It wouldn't be as pretty though.)
Oh how fun. My kids would absolutely love these. Thanks for sharing this simple recipe!
What an awesome idea! I so want to try this!
Those are so adorable! I have noticed a lot of people made homemade things this year instead of store-bought. Yay!
I love this idea! What a great, inexpensive treat!
What a great idea!
These are awesome. I am trying to convince my mother to let me do this. I can finally make a treat by myself. Everyone at my school is making these and I wanted to join the crowd. Thenk you for the instructions.
This looks like fun and with the right colors they would make good Halloween treats for the kids. I am not much of a candy guy, I'd rather have a piece of dark chocolate or a homemade cookie, but my kids love this kind of stuff, they would have a blast!
Making these!! So cute and easy!
i love this idea.......thanks for sharing
Post a Comment